Sales And Distribution(SD)
Understand an integrated order-to-cash cycle to S/S4HANA using Global Bike.

Before you use this case study, you should be familiar with Navigation in SAP System. The data entry requirements in the sales & distribution exercises were minimized because much of the data was stored in the SAP system. This stored data, known as master data, simplifies the processing of business transactions.
In the sales order process, we used master data for customers, materials, and pricing to simplify the sales order process.
In this case study, we will create the master data for a new customer.
SD Organizational Structure:
- Client: An independent environment in the system.
- Company code: Smallest org unit for which you can maintain a legal set of books.
- Credit Control Area: An organizational entity that grants and monitors a credit limit for customers. It can include one or more codes.
- Sales Organization: An organization unit responsible for the sale of certain products or services. The responsibility of a sales organization may include legal liability for products and customer claims.
- Distribution Channel: the way in which products or services reach the customer easily. For example, you can say wholesales, retail and direct sales are the distribution channel.
- Division: Division is the way of grouping products, materials, and services.
- Sales Area: It is the combination of Distribution Channel.Organization and division. Example pricing for sales activities.
- Plant: It basically from which the products should be delivered to the customer.
In SD module total 17 steps is available
Step 1: Create a new customer
Step 2: Create Contact Person for Customer Click here
Step 5: Create Customer Quotation Click here
Step 6: Create Sales Order Referencing a Quotation Click here
Step 7: Check Stock Status Using T-Code MMBE Click here
Step 8: Display Sales Order Using T-Code VA03 Click here
Step 9: Start Delivery Process using VL01N Click here
Step 10: Check Stock Status using MMBE Click here
Step 11: Pick Materials on Delivery Note Click here
Step 12: Post Goods Issue using T-Code VL02N Click here
Step 13: Check Stock Status using MMBE Click here
Step 14: Create Invoice for Customer Using VF04 Click here
Step 15: Display Billing Document And Customer Invoice using T-code VF03 Click here
Step 16: Post Receipt of Customer Payment Using F-28 Click here
Step 17: Review Document Flow Using T-Code VF03 Click here
For creating a new customer, enter transaction code XD01 in the search box. Otherwise, you can follow this menu path
Logistics ► Sales and Distribution ► Master Data ► Business Partner ► Customer ► Create ► Complete

In the Create Organization: Role FI Customer screen make sure FI Customer (New) is selected in the field Create in BP role
Title: Company
Name: The Bike Zone_Learn-###
Search Term: ###
Street: 2144 N Orange Ave
Postal code: 32804
City: Orlando
Country: US
Region: FL
language: EN
Then click on  in the area Standard Address options and select Transportation Zone: Region East(0000000001) and Enter
in the area Standard Address options and select Transportation Zone: Region East(0000000001) and EnterClick on More>>Company Code

In the tab Customer: Account Management
Company Code: US00 and confirm with Enter.
Reconciliation acct: 110000
Sort Key: 001 and confirm with Enter.
Then click on the tab Customer: Payment Transactions
Payment terms: 0001. Confirm with Enter.

In the drop-down menu behind Create in BP role, choose Customer. In the pop-up screen click on Save
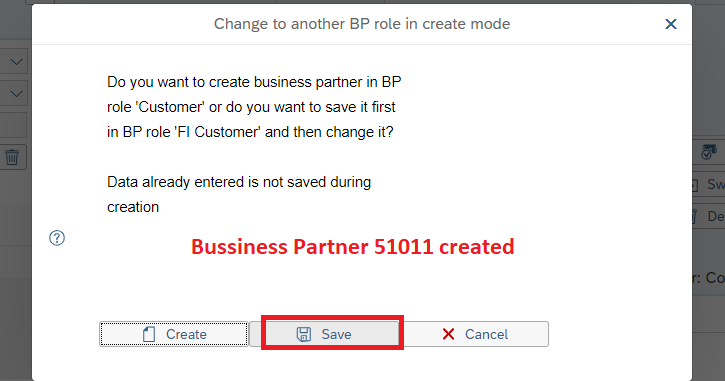
Now click on More>> Sales and Distribution(Double Click)
Sales Org: UE00
Distr.Channel: WH
Division: BI Confirm with Enter.
 |
Sales District: US0003
Price Group: 01
Cust.price.proc: 1
Customer Group: 01
Now Click on Shipping Tab
Delivery Priority: 02
Shipping Conditions: 01
Delivering Plant: MI00
Max.Part.Deliveries: 3

Navigate to the tab Billing
Incoterms: FOB
Incoterms Location 1: Miami
Acct Assmt Grp Cust:01
all three Tax classific: 0 Confirm with Enter
Payment Terms: 0001 Confirm with Enter
Check with the screen below.

Click on to save your new customer data. The SAP-System creates a unique customer number.
Click on to return to the SAP Easy Access screen.
to return to the SAP Easy Access screen.Now successful you have finished the first step Create New Customer. Now you have to finish Step 2: Create Contact Person for Customer Click here


